Alloy Drag Bits: Why Pulling Out Right Matters as Much as Drilling In
Nobody talks much about tripping out. Drilling gets the glory — penetration rates, footage per shift, beating the estimated time to depth. Pulling the string back out? That's just the cleanup. Until it isn't. Until you're halfway out of a hole and the bit hangs up on a ledge of packed cuttings, or the carbide inserts catch a collapsed section of wall, or some cowboy on the controls decides to yank instead of work it free, and suddenly you're fishing instead of tripping.
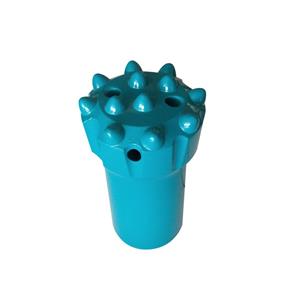
Alloy drag bits — those three-wing carbide-insert workhorses that dominate soft to medium formation drilling — are especially vulnerable during extraction. Their wide wing profile makes them efficient at cutting, but it also makes them good at catching on irregularities in the borehole wall. Here's how to pull them without turning a routine trip into an underground recovery operation.
Before You Pull: Clean the Hole First
The single most avoidable cause of stuck bits during tripping is cuttings left in the hole. At the end of a drilling cycle, the borehole is full of suspended rock fines, mud, and whatever the bit has been chewing through. If you stop the flush flow and immediately start pulling, those solids settle around the bit body. The wider the bit wings, the more surface area there is for settled cuttings to pack against.
The fix takes two minutes: before you touch the hoist, run the flush pump at full volume for at least one to three minutes with the bit still on bottom. Rotate slowly — just enough to keep the cuttings in suspension. Watch the return flow at the collar. When it runs consistently clear, the hole is clean enough to trip. If it's still cloudy, keep circulating.
This step matters more with drag bits than with roller cone bits because drag bits don't have moving parts that can crush settled debris out of the way. A tricone bit can roll over a small pile of cuttings on the way out. A three-wing drag bit will catch it like a plow and wedge tight.

When the Bit Hangs Up: Back Off, Don't Yank
You're pulling the string and suddenly the weight indicator jumps. The bit won't move. Somewhere down there, a wing has caught something — a ledge of compacted cuttings, a slight dogleg in the hole, a section of wall that's partially collapsed.
The wrong response — and the one that causes most of the damage — is to hit the hoist harder. More pull turns a stuck bit into a broken bit. Instead: lower the string back down. Just a short distance, enough to disengage whatever the bit is snagged on. Then rotate slowly — really slowly, 30 to 50 RPM — while working the string up and down in short strokes. The goal is to ream the tight spot open with the bit's gauge surface, not to power through it.
If the bit freed up and the string is moving smoothly again, continue tripping. If the same spot catches the bit a second time, the hole needs more work — you'll need to go back to bottom, circulate, and ream the tight zone properly before pulling through it. Annoying, but a lot less annoying than a snapped drill rod and a bit left in the hole.
The Bit Is Out: Now What?
Pull the bit off the drill rod and look at it before you put it away. Here's what you're checking:
The carbide inserts along the wing edges. Are any chipped or missing? A single chipped insert on a three-wing drag bit won't stop it from cutting, but it means the remaining inserts on that wing are carrying more load than they were designed for. The wing will wear unevenly, and uneven wing wear makes the bit walk off-center on the next hole.
The water passages between the wings. If they're packed with dried mud, the bit won't cool properly next time. Pick it out now — it's ten times harder to remove once it's dried solid.
The threaded connection. Drag bits often run on tapered connections, and a connection that's been spinning at torque for hours will have some wear. Look for galling on the thread faces — shiny, torn-looking metal instead of clean machine marks. Galling means the threads were under-lubricated or over-torqued, and the connection is compromised. A galled connection might hold for another hole, or it might back off at 150 meters. Don't gamble.
Clean the bit, wipe down the threads, spray some rust inhibitor on the steel body, and put it away where other tools won't bang against the carbide edges. Carbide is hard, but it's also brittle — a sharp impact from a dropped wrench can chip an insert as easily as hard rock can.
Three Things You Should Never Do With an Alloy Drag Bit
Never run it dry. This one's non-negotiable but it still happens — a water pump fails, a hose kinks, and someone decides to finish the hole without flush because "we're almost there." Without cooling, the carbide inserts overheat in seconds. Tungsten carbide doesn't melt, but the cobalt binder that holds the carbide grains together softens above 500°C. When the binder softens, individual carbide grains pluck out of the cutting edge, and the insert wears at ten times its normal rate. A few seconds of dry running can do more damage than an entire shift of wet drilling.
Never force a drag bit into hard rock. Alloy drag bits are designed for clay, mudstone, weathered sandstone — soft to medium formations where shearing is the dominant cutting mechanism. When you hit a hard limestone stringer, a chert nodule, or a layer of abrasive quartzite, the carbide inserts can't shear anymore. Keep forcing weight on the bit and the inserts will chip, fracture, or peel clean off the wing shoulders. That's not a design flaw — it's using the wrong tool for the formation. Switch to a tricone bit or a diamond-impregnated bit when the ground gets hard. The cost of swapping bits mid-hole is trivial compared to destroying a drag bit and potentially damaging the drill rod in the process.
Never drill into a hole with debris in it. If a chunk of rock has spalled off the wall and settled at the bottom, or if a tool or fitting has been dropped downhole, don't try to drill through it. The bit will ride up on the debris, deflect sideways, and either drill off-course or jam. In the worst case, the bit wedges against the debris and the hole wall simultaneously, and you're looking at a stuck string and a potential redrill. Clear the hole first. Always.