Pneumatic Drill Vibration and Power Loss: The Consumables You're Overlooking
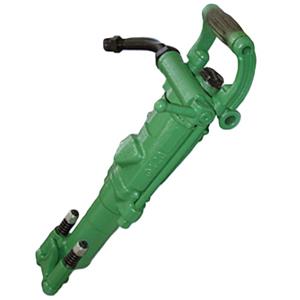
A pneumatic rock drill that's shaking hard enough to numb your hands isn't just uncomfortable — it's destroying itself. Every minute of excess vibration is hammering the internal components, ovalizing bores that are supposed to be round, and turning precision clearances into sloppy gaps. And here's what most troubleshooting misses: the root cause is rarely inside the drill body. It's at the working end, where the shank adapter meets the drill rod and the rod meets the rock.
Before you tear down the drill or call the mechanic, check the three cheap things first.
The Air Leg Problem: It's Usually a Five-Dollar Seal
If the air leg on a hand-held pneumatic drill is losing thrust — feeding weakly, retracting slowly, or not holding the drill steady against the face — the problem is almost always in the seals. Not the air supply. Not the compressor. The seals.
Air legs work by pressurizing a cylinder that extends a piston, pushing the drill forward against the rock face. That pressure is contained by a set of rubber seals and gaskets along the piston rod and cylinder connections. Over hundreds of hours of operation, in an environment full of rock dust, water spray, and vibration, those rubber components harden, crack, and lose their ability to hold pressure.
The most common failure point is the main leg seal — the rubber sleeve or diaphragm that separates the high-pressure and low-pressure sides of the cylinder. When it fails, air bypasses internally, and instead of pushing the piston forward, it circulates uselessly between chambers. The leg feels weak, the drill won't hold its position, and the operator ends up leaning into the machine to compensate — which introduces a whole new set of problems with hole alignment and bit loading.
The fix is straightforward: pull the air leg apart (it's a ten-minute job with basic tools), inspect every seal and gasket, and replace anything that's hardened, cracked, or even slightly deformed. These are consumable parts. They're designed to be replaced. Running a drill with degraded seals to "save money" is like running a truck with bald tires — the savings disappear the moment something fails catastrophically.
While you're in there, check the directional valve — the small sliding component that controls whether the leg extends or retracts. If the valve bore is scored, or if the snap ring that holds the valve in position is missing or worn, the leg will behave erratically: extending when it should retract, retracting when it should hold, or cycling unpredictably. A worn valve costs a few dollars to replace and takes about as long as changing a drill bit.

The Vibration Problem: Your Consumables Are Worn Out
When a pneumatic drill is shaking badly — oscillating side to side, the bit wandering off the mark, the whole machine shuddering with every blow — the instinct is to blame the drill's internal hammer mechanism. Sometimes that's right. More often, the problem is at the front end.
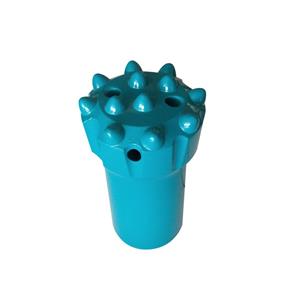
Start with the shank adapter. The shank adapter — the component that sits between the drill's chuck and the drill rod — has two critical functions: it receives the piston's impact and transmits it into the rod, and it holds the rod centered and stable during rotation. The adapter's internal bore has a precise fit with the rod shank, typically with a clearance measured in tenths of a millimeter.
When that adapter bore wears — and it wears with every blow, every rotation, every minute of drilling — the clearance opens up. The rod no longer sits centered in the adapter. Each impact strike pushes the rod slightly off-axis, and between strikes the rod rattles in the oversized bore. That rattling is what you feel as vibration at the drill body.
The wear accelerates once it starts. A rod that's even slightly loose in the adapter bore hammers against the adapter walls with every blow, peening the bore further out of round. The vibration gets worse, which accelerates the wear, which makes the vibration worse — a feedback loop that ends with a shank adapter that's no longer doing its job.
Pull the adapter and inspect the internal bore. If you can feel a ridge or see a visible step where the rod shank seats, the adapter is worn past its service limit. If the rod moves side-to-side in the adapter when it's seated — even slightly — the clearance is too large. Replace the adapter. A new shank adapter costs a fraction of what a drill rebuild costs when the vibration has beaten the internal components to death.
Then check the drill rod. A rod that's been in service for a while can develop a bend that's invisible to the naked eye but devastating at operating speed. Roll the rod on a flat surface — a table, a level concrete floor, anything you know is straight. If you can see daylight between the rod and the surface at any point, it's bent.
A bent rod spinning at 300 RPM doesn't just drill a crooked hole — it whips. The centrifugal force of the bend tries to throw the rod off-center with every rotation, and that force gets transmitted back through the shank adapter into the drill body. The vibration you feel is the rod fighting to run true against a geometry that won't let it.
And here's the hidden cost: a bent rod doesn't just vibrate. It loads the shank adapter unevenly, ovalizing the adapter bore faster than a straight rod ever would. It loads the bit unevenly, wearing one side of the gauge row faster than the other. It loads the drill's chuck bushings unevenly, accelerating their wear. One bent rod in the string is a multiplier of damage across every component it touches.
The Support Angle Problem
One more thing about vibration that's easy to fix and often overlooked: the angle of the air leg relative to the ground. If the leg is set at too steep an angle — nearly vertical under the drill — it can't absorb the recoil from the hammer blows. The thrust force pushes the drill upward instead of forward, and the impact reaction kicks the drill backward. The result is a rocking motion that gets worse as the hole deepens.
The fix is simple geometry. The air leg should be set at a shallower angle — further out from the drill body — so the thrust vector has a larger horizontal component pushing into the face and a smaller vertical component. The exact angle depends on the hole angle and the drill's configuration, but as a starting point, if the leg foot is within arm's reach of the drill body, it's probably too steep. Move it out, and let geometry do the work of absorbing recoil.
The Five-Minute Check That Saves Hours of Downtime
Before you start every shift, run your hand over the shank adapter bore. Roll your drill rods on a flat surface. Check the air leg seals for visible cracking. Three checks, five minutes, and you've eliminated the three most common causes of vibration and power loss before the first hole is drilled. The tooling at the front of the drill takes more abuse than the drill itself. Keep it in spec, and the drill will run smooth all shift.