Reducing Boulder Yield in Bench Blasting: Why More Explosive Isn't the Answer
If you've worked surface blasting for any length of time, you know the feeling. You walk up to the muckpile after a shot, and there they are — half a dozen boulders the size of compact cars, sitting right where the front row used to be. The excavator operator gives you that look. The project manager starts calculating secondary breakage costs in his head. And somebody, inevitably, says the thing you don't want to hear: "Maybe we should add more powder next round."
Here's the thing I learned the hard way, after blowing through enough ANFO to fund a small quarry: boulder problems are almost never about insufficient explosive. They're about energy going to the wrong places. Seal the leaks, and the fragmentation takes care of itself.
Step One: Survey the Rock Before You Touch a Parameter
Before you change hole spacing, before you adjust the powder factor, before you do anything with numbers, walk the bench face. Actually look at it.
The front row of holes and the upper portion of the bench are where boulders come from, and there's a reason for that. The front row is shooting into rock that's already been damaged — by the previous blast, by months of weathering, by free-face relaxation. The upper bench? Same story from the top down. These zones are crisscrossed with open joints and micro-fractures that you can't see from twenty meters away but that will absolutely steal your explosive energy.
When a detonation wave hits an open fracture, it doesn't cross it cleanly. The stress wave reflects, scatters, and loses pressure. The gas that follows — the stuff that actually does most of the rock breaking in a properly designed blast — vents straight into the crack instead of pressurizing the borehole wall. Net result: the explosive went off, the ground shook, and the rock between the cracks never felt enough sustained pressure to break.
Same thing happens at geological boundaries. Hit a clay seam, a shear zone, or a weathered dyke, and the stress wave stops dead. The rock on the other side of that boundary gets shoved out intact, and it lands in the muckpile as a boulder that your secondary breaking crew will be cursing for the next three days.
So step one isn't adjusting anything. It's walking the bench and marking problem zones on a spray-painted sketch: fractured front row here, clay seam there, weathered cap rock across the top. If you don't know where the energy is leaking, you can't plug the holes.

Step Two: The Two Parameters That Actually Move the Needle
Once you know which zones are going to fight you, you can adjust intelligently instead of blindly.
The first parameter worth touching is the hole pattern. A surprising number of quarries still run what you might call the "traditional" layout: small hole spacing with a relatively large burden. The thinking is that close-spaced holes give better fragmentation. The reality is the opposite: small spacing with large burden leaves energy gaps at the toe of the bench, and those gaps produce exactly the boulders and toe remnants that everyone hates.
Flip it. Large spacing, small burden. Stretch the hole-to-hole distance but pull the row closer to the free face. You get two benefits at once: the reduced burden means the front row actually breaks cleanly to the floor instead of leaving a toe, and the wider spacing — as long as it's calculated to give full energy overlap between adjacent holes — covers the rock mass without the wasteful overlap of a tight pattern. The fragmentation comes out more uniform, and you're drilling fewer holes per cubic meter. That's money saved on both ends.
The second parameter is powder factor, and the key is to stop treating it as one number for the whole shot. The fractured front row gets a bump — 10% to 20% more explosive per cubic meter than the baseline. You're not adding power for the sake of power; you're compensating for the energy leakage through those pre-existing cracks. The intact rock behind the front row stays at baseline. And near the final slope wall, you actually pull back the powder factor — slope stability is a safety issue, not a production metric, and overblasting near the perimeter is how you create wedge failures that show up six months later.
Adjust in small increments and test. Add 10% to the problem zone, shoot, check the muckpile. Still boulders? Go to 15%. Don't jump to 25% because you're impatient. Overblasting doesn't just waste money — it creates flyrock, excessive vibration, and a ragged back wall that makes the next round harder to drill.
Step Three: Keep Some Muck as a Buffer
Clean-face blasting — where every ounce of the previous shot's muckpile has been hauled away before the next round — is the default on a lot of sites because it looks tidy. It's also one of the biggest contributors to high boulder yield, and here's why.
When the front row fires into empty air, there's nothing resisting the rock movement except the rock's own inertia. The explosive energy splits roughly into two parts: the stress wave that fractures the rock in place, and the gas expansion that pushes the broken rock forward. With nothing in front of the bench, the gas expansion phase spends most of its energy on throw — accelerating rock outward, away from the face, with no resistance. The fragments fly, they land, they sit there as intact blocks because there was no collision, no inter-particle crushing, nothing to turn big pieces into small ones.
Buffer blasting — leaving a 2- to 4-meter-wide strip of the previous muckpile against the face — changes the physics entirely. The front row fires into that muck barrier instead of open air. The rock fragments slam into the retained pile, collide with each other, and the kinetic energy that would have been wasted on throw gets converted into secondary breakage through impact and crushing. You get smaller fragments, less flyrock, and a tighter muckpile that's easier to dig.
A few things need to be right for this to work: the retained muck has to be dense enough to provide real resistance — loose, fluffy pile won't do it. The powder factor needs to come up by 10% to 20% because you're doing more work (breaking against resistance takes more energy than breaking into free space). And the delay timing between rows should be slightly longer than a clean-face blast to give each row's fragments time to impact and crush against the buffer before the next row arrives.
Step Four: Don't Forget What's Happening at the Top
The stemming zone — that top portion of the borehole filled with inert material rather than explosive — is there for flyrock control, and it's non-negotiable from a safety standpoint. But it creates a problem: the explosive column starts lower in the hole, which means the very top of the bench gets less direct explosive energy. Guess where the next batch of boulders comes from.
You can't shorten the stemming to fix this — that's how you get face bursts and flyrock incidents. But here's a field trick that works: place a small booster charge inside the stemming column, positioned to apply just enough energy to fracture the collar zone without blowing out the stemming. Not a full charge — just enough to crack the top rock so it breaks with the rest of the round instead of riding the gas expansion out as a solid slab. I've seen this technique drop top boulder counts by more than half on benches where collar-zone boulders had been a chronic problem.
While you're at it, sync your initiation sequence with the new hole pattern. Large spacing with small burden works best with row-by-row electronic delays — each row gets a clean shot at the buffer, the fragments collide, and the next row arrives before the muckpile has settled and lost its resistance.
What This Has to Do With O2 Rock Breaking
Everything I've just described assumes you're using conventional explosives in a standard bench blasting setup. But the principles — controlled energy release, minimizing leakage through fractures, using constrained expansion rather than free-face throw — are exactly what make non-explosive rock breaking systems effective.
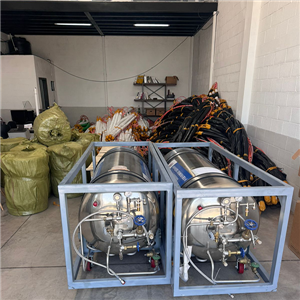
The O2 rock blasting system operates on a fundamentally different mechanism: liquid oxygen phase-change expansion rather than chemical detonation. But the physics of effective rock breaking are the same. Controlled expansion against resistance produces better fragmentation than unconstrained throw. Pre-existing fractures steal energy whether you're using ANFO or LOX. And understanding your rock mass before you design the blast is the difference between a clean muckpile and a boulder farm, regardless of what you're putting in the hole.
For quarries near sensitive infrastructure where flyrock, vibration, and permitting are the binding constraints, the O2 system solves the problems that buffer blasting and careful powder factor control can only partially address. Zero flyrock means no stemming compromise. Controlled energy release means no gas venting through fractures. And the safety distance drops from hundreds of meters to a hundred — which, on a quarry surrounded by roads and buildings, might be the difference between operating and not operating.