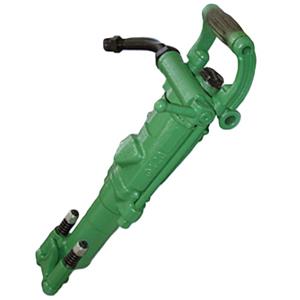
Rock Drill Runs Fine Until You Load It? Start With the Shank Adapter
A rock drill that spins freely at no load but stalls the moment you put it against rock is one of the most confusing failures on a drill site. The drill sounds fine in the air. The rotation seems smooth. You pull the trigger against the face, and within seconds — nothing. The rotation dies. The impact fades. The bit stops.
Most operators go straight for the hydraulic system when this happens. And sometimes they're right. But there are five links in the chain between the power source and the rock, and one of them — the shank adapter — fails more often than all the others combined. Here's the sequence for finding the real problem without pulling apart components you don't need to touch.
The Diagnostic Principle: Follow the Torque
A drill that runs at no load but stalls under load has exactly one fundamental problem: the torque that's supposed to reach the drill bit isn't getting there. Somewhere between the motor and the rock, the torque path is interrupted, degraded, or lost.
The smart diagnostic approach works from the outside in — from the cheap, easy-to-check components at the working end back toward the expensive, difficult-to-access components inside the drill. The logic is simple: if a five-minute external inspection finds the problem, you've saved yourself a two-hour teardown.

Step One: Check the Shank Adapter
The shank adapter — sometimes called the shank, the striking bar, or the anvil — is the component that physically connects the drill's drive mechanism to the drill rod. It receives the rotational torque from the drill's splined drive and transmits it to the rod while simultaneously absorbing the piston's impact and converting it into percussive energy.
Under no-load conditions, a damaged shank adapter can still appear to function. The minimal resistance of spinning in air doesn't demand much torque, so a cracked or partially fractured adapter will rotate freely. But the moment the bit engages rock, the torque demand spikes, and the damaged section of the adapter — typically at the water port — can't transmit the load.
The water port is the most vulnerable point on any shank adapter. It's a hole drilled through the body to allow flush water or air to pass from the drill into the rod, and that hole creates a stress concentration. Under the combined loading of torsion, impact, and the corrosion-acceleration effect of water flowing through it, the material around the water port fatigues faster than anywhere else on the adapter.
When it fails, it usually fails as a partial fracture — a crack that propagates partway through the cross-section. At no load, enough metal remains to spin the rod. Under load, the crack opens, the remaining cross-section can't handle the torque, and rotation stalls.
Pull the shank adapter and inspect it under good light. Look for a crack at the water port — it may be a hairline, barely visible when the adapter is cold and unstressed. Clean the area with a wire brush and look again. Any crack at all means the adapter is done. Replace it before it fails completely — a shank adapter that fractures mid-hole leaves the drill rod and drill bit at the bottom with no way to rotate or retrieve them.
Step Two: Check the Spline Drive
If the shank adapter is intact, the next link in the chain is the splined connection between the adapter and the drill's drive mechanism — usually a splined bushing or coupling that mates with the adapter's external splines.
Splines transmit torque through the contact faces of interlocking teeth. Over time, those faces wear. The wear pattern is predictable: the drive side of each spline tooth gets polished, then grooved, then the tooth profile rounds off. As the clearance between the male and female splines increases, the adapter can rotate slightly within the bushing before the teeth engage. That angular slop means the torque isn't transmitted smoothly — it's transmitted as a series of impacts as the spline faces slam together with each rotation.
Under load, a severely worn spline will slip entirely — the teeth will ride over each other rather than engaging, and rotation stops. At no load, the minimal friction might still carry the rotation, masking the problem until the bit touches rock.
Pull the drive bushing and inspect the spline teeth. If the tooth faces are polished bright and the edges are rounded rather than sharp, the splines are worn. Check the adapter's splines at the same time — if one is worn, the other is too, because they wear as a pair. Replace both together, not one at a time.
Step Three: Check the Hydraulic Pressure Under Load
If the mechanical components from the shank adapter back through the spline drive are all intact, the problem is in the hydraulic system. But don't guess — measure.
A hydraulic rock drill should show a specific pressure rise when the bit engages rock. The rotary circuit's pressure gauge should climb from its no-load reading — typically a few hundred PSI — to the rated working pressure as the bit starts cutting. If the pressure doesn't rise when the bit engages, hydraulic oil isn't reaching the motor at the required pressure. If the pressure spikes instantly and the relief valve opens, there's a mechanical blockage downstream.
The most common hydraulic causes, in order of likelihood: low oil level or contaminated oil (check the sight glass and the oil condition — cloudy or milky oil has water in it, dark or burnt-smelling oil has overheated), a stuck relief valve (tap it gently with a soft-faced hammer to free a stuck spool), or a failing pump (listen for cavitation noise — a rattling or growling sound from the pump that changes pitch under load).
Step Four: The Drive Shaft and Motor
If everything upstream checks out — shank adapter, splines, hydraulic pressure — the problem is in the drive shaft or the hydraulic motor itself. These are internal components that require partial disassembly to inspect, which is why they're last in the sequence.
A drive shaft with a worn bearing journal will run true at no load but deflect under load, binding against its housing and stalling rotation. A drive shaft with a damaged keyway or spline will transmit rotation intermittently. A hydraulic motor with worn internal vanes or pistons will spin freely without resistance but can't develop torque when loaded.
By the time you've eliminated the shank adapter, the spline drive, and the hydraulic supply, you've ruled out 80% of the possible causes. If the problem is the drive shaft or motor, the symptoms will have been clear enough by this point to justify the teardown.
The "Five-Minute Check" That Covers Most of This
Before every shift, pull the shank adapter and look at the water port. Run your finger over the spline faces — polished is worn, sharp is good. Check the hydraulic oil sight glass. Three checks, and you've covered the three most common causes of a drill stalling under load. Most importantly, if you catch a cracked adapter or worn splines during inspection, you're fixing it on your schedule — not in the middle of a hole with a crew standing around and a bit stuck at depth.