Drilling rig compressor not delivering air properly? Don’t panic — 3 main causes and how to troubleshoot
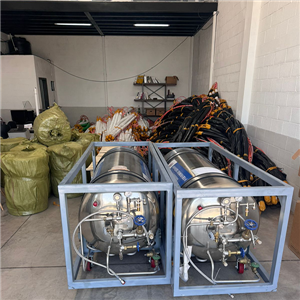
The compressor on a drilling rig is the “power heart” of operations. When air delivery drops, downstream equipment starves, productivity falls, and the whole workflow can be affected. Most delivery problems trace back to three areas: intake restrictions, compressor (compression end) faults, and blocked or leaky discharge paths. Below is a step‑by‑step troubleshooting guide to help you quickly find and fix the issue.

Intake blockage — if the intake is restricted, output will fall The air filter (intake filter) is the compressor’s first line of defense and also the most common failure point. If the filter isn’t changed regularly, dust and debris build up on the media and the compressor effectively breathes through a “mask,” greatly reducing intake volume. In dusty workshops the filter can clog within 1–2 months and needs prompt attention.
How to check:
Remove and inspect the air filter: if the filter media is blackened, covered in dust, or releases large amounts of dust when tapped, it has failed — replace it.
After replacement, measure intake pressure: intake pressure should be close to atmospheric. If it’s still low, inspect the intake hose for kinks, cracks or leaking joints to ensure the intake path is clear.
Compressor unit faults — problems in the compression end reduce output The main compressor is where air is compressed. Faults here significantly cut gas production. For screw compressors, rotor and tooth-face wear over time increases clearance between rotors, allowing compressed air to leak back and reducing output. For piston compressors, worn piston rings or scratched cylinders impair sealing and likewise reduce production.
How to check:
Listen to the machine: normal operation produces a steady hum. Harsh abnormal noises (metal scraping, high‑frequency squeals) may indicate bearing failure or rotor seizure — stop and inspect immediately.
Measure discharge pressure: if discharge pressure is lower than rated by more than 0.1 MPa and you’ve ruled out a clogged intake or external leaks, internal wear is likely. This requires disassembly and replacement of worn parts.
Discharge path blockage or leakage — loss during delivery Compressed air must travel through pipes and valves to the point of use. Problems here also cause poor end‑user pressure.
Common issues:
Oil separator (oil‑gas separator) clogging: if the separator element isn’t changed, oil sludge and debris block its pores, increasing discharge resistance and lowering flow. A damaged separator can also let lubricant into the air stream, raising oil consumption and contaminating compressed air.
Pipework/valves: internal carbon build‑up or rust can reduce bore size; stuck or leaking safety/check valves or loose fittings let compressed air escape during delivery.
How to check:
Start with the oil separator: check the differential pressure gauge across the separator — if it exceeds 0.15 MPa or the separator has been in service more than ~8,000 hours, replace the element.
Inspect pipework: apply soapy water to joints and valve connections — bubbles indicate leaks; tighten fittings or replace seals as needed.
Check valves: manually actuate safety valves, check valves, etc. If they stick, disassemble and clean debris to restore function.
A quick note on pressure switches Sometimes measured discharge pressure looks normal while the user still feels insufficient air. This can be caused by a faulty pressure switch giving misleading readings. Calibrate or replace the pressure switch to avoid being misled by false data.
Troubleshooting tip Work in the order “intake → compressor → discharge.” Fix simple issues first (blocked filters, expired oil separator, external leaks) before moving on to internal compressor wear. This saves time and prevents unnecessary teardown.
Poor air delivery is solvable — find the root cause and follow these steps, and your compressor will be back to full strength.