Pneumatic Rock Drill Troubleshooting: When the Problem Isn't the Drill — It's the Consumables
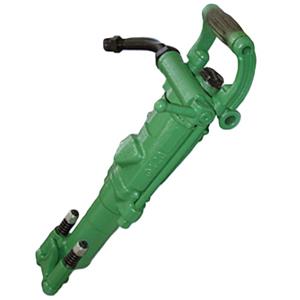
A pneumatic rock drill losing power mid-shift is one of those moments where everyone starts pointing fingers. The operator blames the compressor. The mechanic blames the operator. The site supervisor just wants the hole finished. And more often than anyone wants to admit, the drill itself is fine — the real problem is sitting at the working end of the string, where the drill rod meets the rock.
I've watched crews tear down a perfectly good YT28 because it was "drilling slow," only to find the actual issue was a clogged drill rod that hadn't been flushed in three shifts. Before you call the mechanic, check the cheap stuff first. Here's what actually fails, and how to spot it in under five minutes.
Problem One: The Drill Has No Power and Penetration Rate Is Dead
You pull the trigger, the piston cycles, but the bit just hammers against the rock without really biting. Everyone's first instinct is low air pressure — and sometimes that's right. But chasing air pressure before checking the tooling is doing the work backwards.
Start at the compressor, sure. Make sure it's delivering rated pressure at the drill. But then ask yourself: how many drills are running off the same air line? Every additional pneumatic tool on the circuit drops the available pressure. If you've got two drills and a ventilation fan sharing a compressor, you're probably starving all three. Shut down what you don't absolutely need before blaming the equipment.
Next, check the air hose. Not just for obvious leaks — run your hand along the entire length feeling for pinhole leaks you can hear but not see. A hose that's been dragged across sharp rock for six months will have micro-perforations that bleed pressure silently. While you're at it, measure the hose run. Anything past 15 meters between the compressor and the drill is asking for pressure drop, no matter how good the fittings are. Shorten the run or step up the hose diameter.
Now the part most people skip: look at the consumables. A worn shank adapter doesn't transmit impact energy efficiently — it absorbs it, turning percussive force into heat and vibration instead of rock breakage. Pull the drill rod off and check the shank end for mushrooming, cracks, or uneven wear. A mushroomed shank means the piston isn't striking a clean face, and every blow is partially wasted.
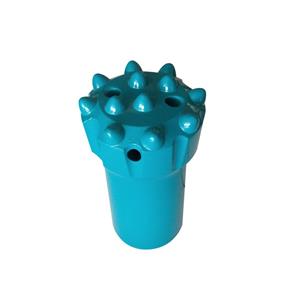
Then check the drill bit. A button bit with flattened or chipped carbide inserts will hammer away for hours without making meaningful progress. The drill cycles, the bit bounces, and the penetration rate looks like a heartbeat on a flatline. Pull the bit, run your finger across the button faces — they should feel rounded and textured, not smooth and polished. Polished buttons are glazed from overheating, and no amount of air pressure will make them cut again.

Problem Two: Water Where It Shouldn't Be, and Drilling Speed That Falls Off a Cliff
Water leaking from the front head of a pneumatic drill is one of those problems that gets worse the longer you ignore it. A few drips at the start of a shift turn into a steady stream by midday, and by then the damage is already happening — water washing the lubrication out of the front head, accelerating wear on every moving part, and turning the drill's internals into a rust factory.
The culprit is usually the water needle — that thin tube running through the center of the piston that injects flush water into the drill rod. Water needles fail in predictable ways: they crack from fatigue, they bend from misalignment, or they clog with mineral deposits from unfiltered water. Any of these will send water into places it shouldn't go.
Pull the water needle and inspect it. A cracked or bent needle needs replacing — no repair, no patch, just swap it. While you're at it, check the needle bore size. Anything under 3 millimeters is going to restrict water flow and cause poor flush performance, even if the needle is otherwise intact. This is one of those specs that gets ignored because "it fits, doesn't it?" — until the drill rod overheats from insufficient cooling and the bit welds itself to the bottom of the hole.
Now check the drill rod. The center flushing hole in a tapered drill rod is the lifeline of the whole system — water goes in, travels down the rod, exits through the bit face, and carries cuttings back up the annulus. If that center hole is packed with dried mud, mineral scale, or compacted rock dust, the flush flow stops. The bit overheats. The cuttings pack. And the drill slows to a crawl.
A quick test: hold the drill rod up to a light and look through the center hole. If you can't see light at the other end, it's blocked. Sometimes you can rod it out with a stiff wire. If not, the rod is done — replace it. A blocked drill rod is like a blocked artery; nothing works downstream.
One more thing about water: the water pressure feeding the drill must be lower than the air pressure driving it. This sounds backwards — shouldn't more water pressure give better flushing? — but here's the physics. If water pressure exceeds air pressure, water forces its way past the piston seals and into the cylinder, washing out the oil film that keeps metal from touching metal. The result is accelerated cylinder and piston wear that turns a $50 seal replacement into a $1,500 cylinder rebuild. Keep water pressure at least 1 bar below air pressure, and check it at the start of every shift.
The Five-Minute Pre-Shift Check That Catches Most of This
Every pneumatic drill setup has three consumable components that determine whether the shift goes smoothly or turns into a repair marathon: the drill bit, the drill rod, and the shank adapter. Spending five minutes on these before the first hole of the day will catch most failures before they happen:
The bit: Spin it slowly and look at every button face under good light. Any flat spots, chips, or cracks mean the bit is on borrowed time. Check the flushing holes in the bit face — blocked holes mean the bit can't cool itself.
The rod: Roll it on a flat surface. Any wobble means it's bent, and a bent rod hammering off-center will ovalize the borehole and destroy the next bit you put on. Check the center flushing hole for blockage. Check the thread or taper connection for galling or deformation.
The shank adapter: Look at the striking face. It should be flat and clean. Mushrooming, pitting, or uneven wear means the impact energy from the piston is being scattered instead of transmitted. Replace it before it cracks — a shank that fractures mid-hole is a retrieval job.
Do this check, fix what's wrong, and your pneumatic drill will spend the shift drilling instead of sitting on the ground surrounded by wrenches and frustrated operators.